
Live Streaming
Streamwell is highly compatible with a number of different types of incoming live streams. It accepts H.264 or HEVC (H.265) over RTMP, RTMPS, SRT, and WebRTC (WHIP) protocols. The pages in this section go over just a few of the ways to get your video into Streamwell:
OBS (New to streaming? Start here!)
Hardware Encoders like Blackmagic and Magewell
NDI Workflow Examples
Stream from Chrome in a pinch
Stream from mobile apps
Choosing the Right Bitrate
Streamwell can handle incoming stream bitrates of 100Mbps or more. However in real-world scenarios you need to consider your network capacity, number of viewers and what their internet connectivity will be like.
Here are some recommended bitrates depending on resolution and frame rate. Start with these and move up or down to suit your use case. Each 8000 Kbps / 8Mbps represents a real-world speed of one megabyte per second of video per viewer.
1080p
24/30 fps : 4000 Kbps (recommended for best results) 60 fps: 6000 Kbps
720p
24/30fps: 2500 Kbps 60fps: 4000 Kbps
4K / 2160p
24/30 fps: 12000-16000 Kbps 60fps: 20000-24000 Kbps
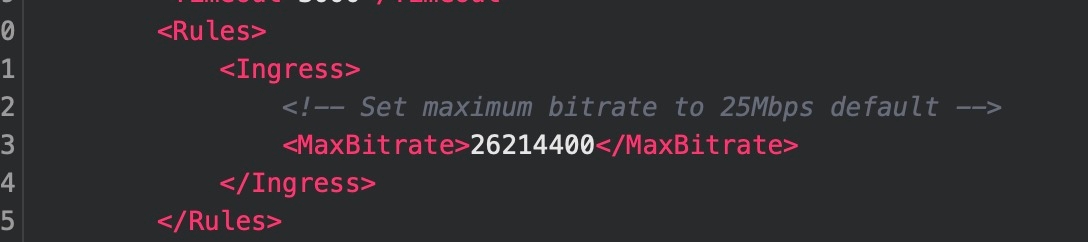
Note: By default, the Streamwell Engine is configured to block streams over 25Mbps. This is to prevent a "runaway encoder" causing problems for other streamers/viewers on the network. However this value can be edited or removed in the engine configuration:
Streams with high bitrates (over 4000Kbps) require a very high-quality network connection, especially when streaming to a cloud-based server. Depending on your or your viewers' network connection and geographical location, you may need to drop the bitrate or switch to HLS mode to sustain playback over the internet. Consider use of Proxy Streaming to help in difficult network conditions as well.
Notes on HEVC (H265), 10-bit and HDR Streaming 🌈
Ultra-Low Latency HEVC is supported by Google Chrome v136 (May 2025) or Safari v18 (2025).
Older versions of these browsers will experience latency of 2-3 seconds since playback occurs over HLS instead of WebRTC.
FireFox v136+ works but only with HLS playback for HEVC. Previous versions of FireFox do not support HEVC.
10-bit video is supported for Ultra-Low Latency playback, however streams containing HDR metadata still require use of the HLS (DVR) fallback player with 2-3 seconds latency. You will see these as tone-mapped to SDR if using the Ultra-Low Latency player.
Playback of HEVC, especially 10-bit or HDR, requires a robust computer and network connection.
macOS / Apple operating systems generally handle HEVC formats the best. For best color accuracy it is recommended to use an iPad Pro with OLED or any device with an Apple-made screen, and the true-tone functionality deactivated.
Some Windows-based computers may not be able to playback 10-bit 4:2:2 ("main 4:2:2 10" profile), in which case use of 10-bit 4:2:0 ("main10" profile) is recommended.
NDI
For editors and creative professionals using software like Adobe Premiere or Final Cut Pro, see Streaming with NDI for a step by step tutorial on enabling NDI streams to Streamwell.
Last updated