
Installing Streamwell
Using Streamwell in the Cloud? Skip right ahead to our Streaming tutorials to get started!
Before you begin, make sure your Streamwell server:
Meets the requirements including a running installation of Docker
Has a known or fixed IP address on your network
Has root / admin access enabled (required on Linux and macOS)
If you plan to expose your server to the internet, make sure you:
Forward the applicable ports from your router to the IP of the server (example)
Point the DNS A records from your domain name to the public IP of your router (example)
(Recommended) Configure firewalls on your server & router (example)
We offer an easy express installation script for Linux and macOS, however you can use the Manual Installation steps on any operating system / appliance that runs Docker.
Express Installation
With Docker installed and running, open an Ubuntu Linux or macOS terminal window and run this command:
/bin/bash -c "$(curl -fsSL http://files.streamwell.net/install.sh)"The on-screen prompts will ask you to choose an install directory and set a system key, or press enter to leave the default settings. After a few seconds, you should be ready to say "Hello World" to your new Streamwell server 😎
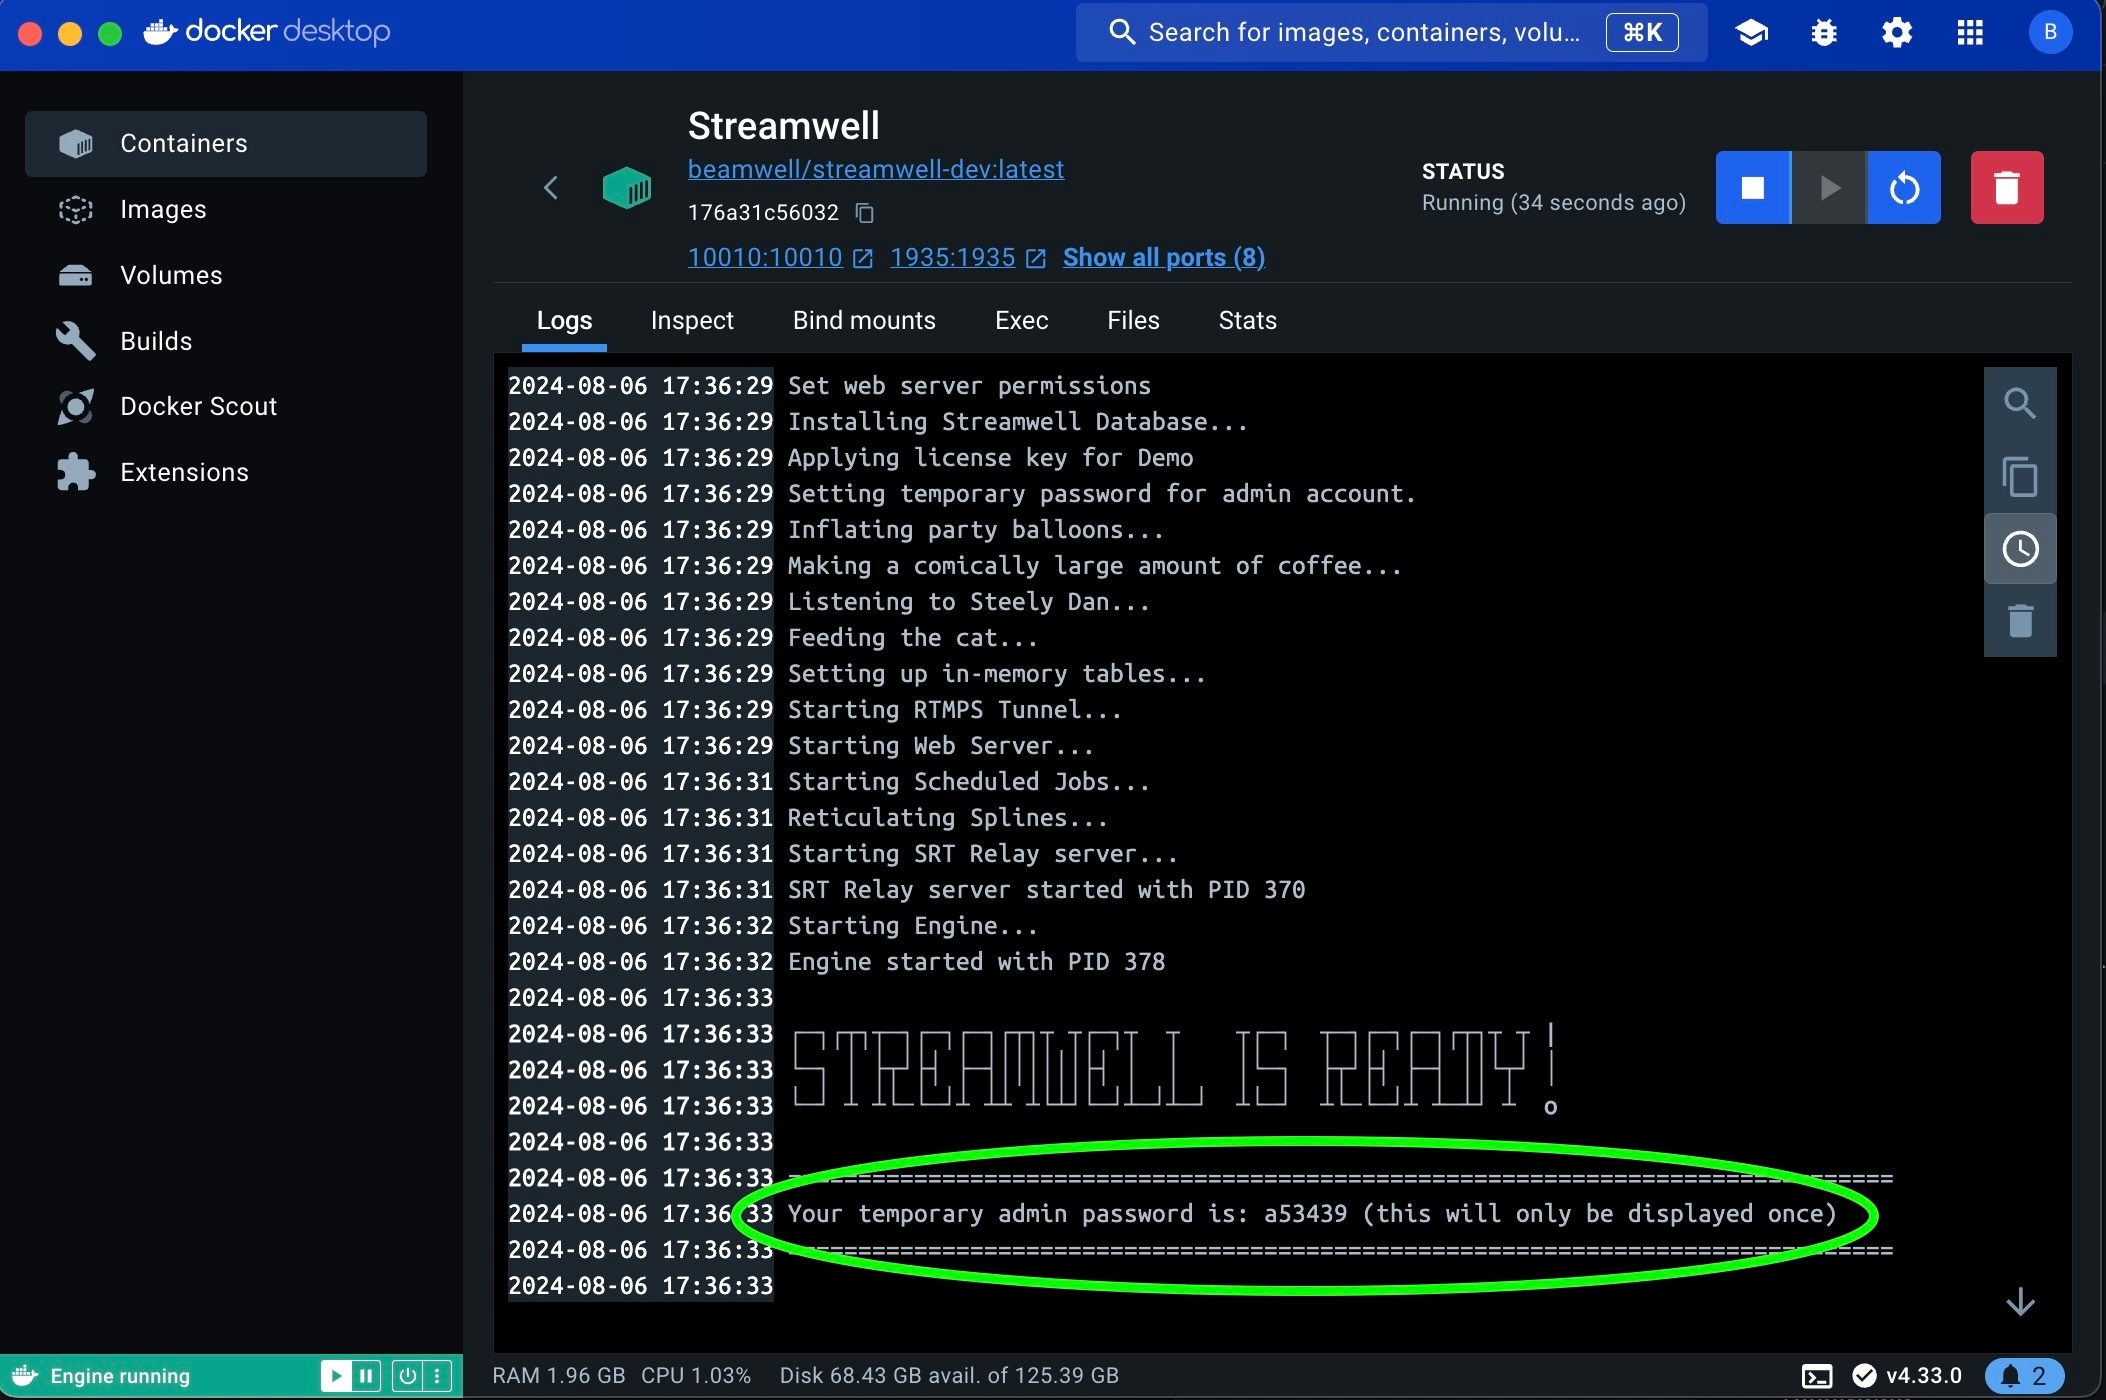
The first time you start Streamwell, it will generate a one-time admin password for your first login, at which time you will be required to change the admin password. The password is printed to the Docker logs which can be viewed by clicking the container name in Docker Desktop running this command after the installation completes: docker logs -f Streamwell
Please note these scripts are not guaranteed to work on all systems! If you are running in an enterprise or managed environment, you will likely need to proceed with Manual Installation.
Manual Installation
For installation on other Linux distros, Windows, or for more control over the docker installation including port and environment variable settings, start by pulling the latest available docker image:
docker pull beamwell/streamwell:latest
Create or mount directories to hold your SSL certificate, recordings, logs and uploaded files. By storing these outside of the Docker container we are about to create, we can freely update it without fear of losing them:
mkdir ssl rec log files
Time to start up the Streamwell container! Docker Compose is recommended but here is a breakdown of the essential run command:
docker run -d --name Streamwell --restart always -e SYSTEM_KEY="yourSecretKey" --network host -v ~/ssl:/etc/letsencrypt -v ~/rec:/rec -v ~/log:/log -v ~/files:/files beamwell/streamwell:latest
What do these commands mean?
docker pull downloads the application image and version specified (e.g. mycompany/myapp:version).
docker run -d --name Streamwell runs a detached container (so we can close the terminal) and calls it Streamwell
--restart always If the container crashes or is rebooted due to a power failure / system restart, it will automatically restart itself
-e Optional Environment Variables to tune the config right at launch. Here are the available options:
SYSTEM_KEY - we use this as the encryption key inside the application, to secure your links and stream keys. If you don’t pass a key in, one will be created for you and printed a single time in the startup logs (use docker container logs Streamwell to view those logs).
ADMIN_PW - instead of us creating a one-time password for your first login to the web interface, provide your own password here and it will be set for you.
WS_PROXY and HLS_PROXY - by default, stream data passes through an Apache proxy so users don't need to worry about opening traffic on additional ports. Set these environment variables to "false" to disable use of the proxy. This may be helpful in environments where system resources are limited or expected system load is very high.
STREAMWELL_DOMAIN_NAME and STREAMWELL_DOMAIN_EMAIL - Streamwell will automatically configure HTTPS for your server, assuming it is reachable over the internet at that domain name. You can also easily configure this later in the web interface.
HTTP_PORT, HTTPS_PORT, WS_PORT, WSS_PORT, RTMP_PORT, RTMPS_PORT, HLS_PORT, HLS_TLS_PORT, HLS_LEGACY_PORT, HLS_LEGACY_TLS_PORT, API_PORT, SRT_PORT, SRT_RELAY_PORT, DATA_PORT - Customize which ports run which services. The web server always runs within the container on the standard ports 80 / 443, but you can pass HTTP(S)_PORT variables and map different ports to serve the web client interface if required, e.g. -p 8080:80 -p 8443:443 -e HTTP_PORT=8080 -e HTTPS_PORT=8443
UPLOAD_MB_LIMIT - sets the maximum file upload size in megabytes (e.g. UPLOAD_MB_LIMIT=512). The default is 256. The maximum is 1024.
SESSION_EXPIRY - By default, users are logged out after 24 hours (1440 minutes) of inactivity. Set this variable anywhere from 1 minute - 525,600 (a year) to adjust.
TZ - overrides the default internal timezone setting of 'UTC' (details)
STREAM_WORKER_COUNT, RTMP_PROVIDER_WORKER_COUNT, SRT_PROVIDER_WORKER_COUNT, WEBRTC_PROVIDER_WORKER_COUNT, WEBRTC_PUBLISHER_WORKER_COUNT, HLS_PUBLISHER_WORKER_COUNT, APP_WORKER_COUNT, WEBRTC_PROVIDER_TCPRELAY_WORKER_COUNT, WEBRTC_PUBLISHER_TCPRELAY_WORKER_COUNT, DECODER_THREAD_COUNT - adjust the number of CPU worker threads for each of the various providers/publishers in OvenMediaEngine. The most used one is STREAM_WORKER_COUNT which allocates CPU threads to ultra low latency playback sessions. This will need to be increased substantially once you get above a small number of live viewers / data output (around 50 viewers / 250Mbps). Likewise for APP_WORKER_COUNT which may need to be increased if you are sending a large number of streams into the server. DECODER_THREAD_COUNT should only be set higher if you are streaming in HEVC, 4K, HDR or very high bitrates.
AUTO_RESTORE (previously RESTORE_DB)- This can be used when updating Streamwell. If set to "true", the installer will automatically restore the last database backup that was made, assuming the /files directory hasn't been moved. You can also restore your database through the admin panel afterward.
AUTO_BACKUP and BACKUP_PATTERN - These will, by default, be set to backup the database each night at midnight however you can supply your own cron pattern for more frequent backups or set it to false to disable the feature.
API_ENABLED, API_USER, API_KEY (Pro license required) - Enable a basic REST API for management of users and channels. The 'user' and 'key' are effectively a public/private key pair you can choose to send using Basic HTTP authentication with your requests. See REST API for more.
LOG_QUERIES - Enable SQL query logging to "/log/queries.log".
-p Connect this port from the outside world to the container. On Linux hosts, you don’t need to do this. Instead you can use the argument --network host in your command for optimal performance. Or connect the ports manually if you prefer.
-v Connect this folder from the computer running Docker to the container
The -v flag is particularly useful since that lets you house things like file uploads, recordings, logs, certificates and more on the host server rather than in the running container. So when you need to update the application it is as simple as replacing the running container with one run from an updated image. While not absolutely required, you should create these directories on your server for data persistence outside of the Docker container:
-v /your/path/to/SSL:/etc/letsencrypt
-v /your/path/to/LOGS:/log
-v /your/path/to/RECORDINGS:/rec
-v /your/path/to/FILES:/files
BEST PRACTICE: Once you figure out the run command for your system, tuck it away somewhere so you can easily re-deploy whenever you Update Streamwell
Docker Compose
For sysadmins and power users, it is highly recommended to use Docker Compose to manage your Streamwell installation. Here are a few tips to help you:
The basic run command once this file is in place with the name
docker-compose.ymlisdocker compose up -dwhere the-ddetaches the process and allows it to run in the background.You can restart the service with
docker compose restartbut take note thatdocker compose downwill delete your container.To update, click 'backup database' in the web admin or place your own backup in the
/logdirectory. Then either update the image tag in the docker compose file (beamwell/streamwell:versionyouwant) or pullbeamwell/streamwell:latestto get the latest update. Make sure theRESTORE_DBvariable is set to true, then rundocker compose up -dand Docker will recreate the container, restoring your backup into the new container. Log in as an admin and go to the 'admin' section to trigger an automatic database schema update if required, or you could manually run the .sql update files in the root of the container against your backup before you run the container.None of the environment variables or volume mappings are required to run the container.
Use host networking mode whenever possible for best performance (
network_mode: host) instead of mapping the ports (delete theports:entry)For non-standard HTTP/S ports, you need to use port mapping because the internal HTTP/S services always run on ports 80/443. The other services will actually change the ports they run on internally when you specify the environment variables.
Streamwell does not (yet) work in a replicated or load-balanced configuration, however other means of clustering or multi-server configurations are possible via Pro Services.
Last updated