Advanced Configuration
Ready to dive in with some more advanced features? Here are some quick start tutorials. Heads-up: assistance with advanced configurations is not covered by regular maintenance support and would constitute professional services if you require it. Remember you can always experiment, then reset the engine config and it will go back to the way it was when you started up Streamwell.
Performance Tuning
Larger-scale deployments will require some performance tuning on the server itself once viewership or stream counts reach into higher numbers.
These optimizations are all to do with OvenMediaEngine, the streaming engine that powers Streamwell. They are borrowed with gratitude from these OME guides (Troubleshooting and Performance Tuning) which any sysadmins should dive into deeper to realize the best performance for your server.
Choosing the Right Host OS
Streamwell works great on any modern Mac or Windows computer running Docker. However, there are network performance limitations in these operating systems (especially when factoring in the emulation layer they run for Docker) that limit them to serving a certain amount of concurrent viewers - in our testing we haven't met a modern machine that couldn't easily handle 25 viewers at 1080p / 4Mbps. But for anything more than that (25 simultaneous viewers or 100Mbps throughput) we recommend using a native Linux-based host OS instead of macOS or Windows. Read on for more tuning and testing advice.
Adjusting Thread Counts Across Cores
The 'StreamWorker' process is one of the hardest-working components of OME. In your engine configuration (under Administration -> Server -> Engine Control), increase the various "worker" thread counts, especially StreamWorker count to match the number of CPU cores you have available:
<StreamWorkerCount>8</StreamWorkerCount>
If you are streaming primarily to HLS viewers, you should also set the HLS Worker Counts appropriately.
It is assumed that the CPU cores provided are powerful enough to sustain single-threaded operations like decoding. Mobile CPUs, efficiency cores or virtualized processors should only be used if you are certain they are not choking at the per-thread level.
A great way to check this is to run the top command on your host, get the PID of "OvenMediaEngine" then run top -H -p 12345 where 12345 is the PID. It will show you the individual threads running within the application. If any of these are hitting 100% that means the individual threads are overloaded and your CPU cores are not fast enough for the task at hand.
Tuning the Linux Kernel
By default, the Linux Kernel cannot handle high-throughput. There are some system-level configuration files you can edit with more optimized values:
/etc/sysctl.conf
fs.file-max = 100000
net.core.somaxconn = 65535
net.ipv4.tcp_max_tw_buckets = 1440000
net.ipv4.ip_local_port_range = 1024 65000
net.ipv4.tcp_fin_timeout = 15
net.ipv4.tcp_window_scaling = 1
net.ipv4.tcp_max_syn_backlog = 3240000
net.core.rmem_max = 16777216
net.core.wmem_max = 16777216
net.core.rmem_default = 16777216
net.core.wmem_default = 16777216
net.core.optmem_max = 40960
net.ipv4.tcp_rmem = 4096 87380 16777216
net.ipv4.tcp_wmem = 4096 65536 16777216
net.core.netdev_max_backlog = 50000
net.ipv4.tcp_max_syn_backlog = 30000
net.ipv4.tcp_max_tw_buckets = 2000000
net.ipv4.tcp_tw_reuse = 1
net.ipv4.tcp_fin_timeout = 10
net.ipv4.tcp_slow_start_after_idle = 0
/etc/security/limits.conf
* soft nofile 1048576
* hard nofile 1048576Performance Testing
Here is a great tool for testing multiple connections to the server: http://files.streamwell.net/tester.zip
To run the test:
Install or confirm you are running GO on your test client: https://go.dev
You will need to disable SignedPolicy in the Engine config temporarily for the test to run. Under Administration -> Server -> Engine Control -> Configure Engine, comment out or cut the <SignedPolicy> section of the config.
Choose an open channel and copy the stream key only (minus the signature, everything including "?=" forward)
Start your test stream and run OvenRTCTester like so (use wss: if you are connecting to a hostname with HTTPS enabled):
$ go run OvenRtcTester.go -url "ws(s)://<SERVER-IP-OR-HOSTNAME>/live/streamKey" -n "25"Adjust the -n value up bit by bit to add more simulated viewers as your tests complete successfully. Please note you will need to conduct these tests on a fast machine with fast networking as it is playing the role of potentially hundreds of viewers. A good way to conduct this test is to spin up a VPS on a reliable service like DigitalOcean and run the test from there. This ensures that your local network / computer is not acting as a bottleneck.
SRT Encryption
SRT passphrase encryption is available, along with 50+ other native SRT socket options.
To enable SRT encryption, simply uncomment this section in the engine configuration and change the passphrase to something you are familiar with:
<!-- <Options>
<Option>
<Key>SRTO_PASSPHRASE</Key>
<Value>thisismypassphrase</Value>
</Option>
</Options> -->N.B. SRT Passphrases must be between 10-80 characters in length or the Engine may not start!
You can also add additional SRT socket options in the same manner as shown above. Only the SRTO_PASSPHRASE option has been tested with Streamwell but you can really get into fine-tuning if you are brave!
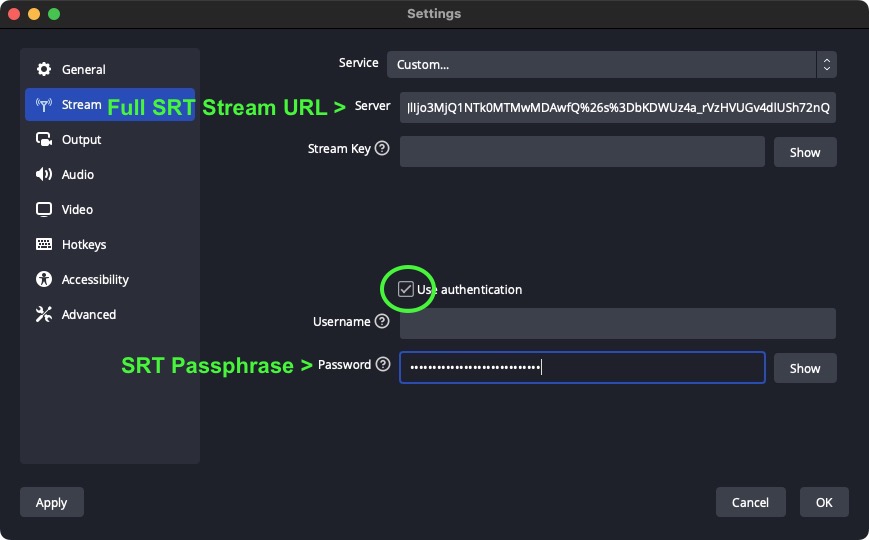
Different encoders have different ways of setting the SRT encryption. As an example using our old friend OBS, you can enter the passphrase as shown (the stream key itself stays the same):

Proxy Streaming / ABR
To enable Proxy Streaming, first check the engine configuration and uncomment the sections related to ABR:
<!-- Uncomment for ABR / Proxy Stream -->
<!-- <Playlist>
<Name>ABR_HLS</Name>
<FileName>hls_abr</FileName>
<Options>
<WebRtcAutoAbr>false</WebRtcAutoAbr>
</Options>
<Rendition>
<Name>Original</Name>
<Video>original_video</Video>
<Audio>aac_audio</Audio>
</Rendition>
<Rendition>
<Name>Proxy</Name>
<Video>proxy_video</Video>
<Audio>aac_audio</Audio>
</Rendition>
</Playlist>
<Playlist>
<Name>ABR_WebRTC</Name>
<FileName>abr</FileName>
<Options>
<WebRtcAutoAbr>false</WebRtcAutoAbr>
</Options>
<Rendition>
<Name>Original</Name>
<Video>original_video</Video>
<Audio>opus_audio</Audio>
</Rendition>
<Rendition>
<Name>Proxy</Name>
<Video>proxy_video</Video>
<Audio>opus_audio</Audio>
</Rendition>
</Playlist>
--> <!-- <Video><Name>proxy_video</Name>
<Codec>h264</Codec>
<Bitrate>500000</Bitrate>
<Profile>baseline</Profile>
<Preset>slow</Preset>
<Width>640</Width>
</Video> -->For a quick-start, simply uncomment these and commit the new configuration, then restart the engine. To use your new Proxy Streaming config in the web client, enable Proxy Streaming under Administration -> Server -> Features.
You can edit the encoding settings and add additional <Rendition> entries, each linked to a <Video> component by name, or add more <Video> components to provide multiple qualities. Just remember that for each entry in the <Rendition> list your server will need to transcode another video stream for each channel that is live. This can quickly consume CPU resources at an exponential level, so please be aware of this as you enable transcoding functionality.
See more on this via the OvenMediaEngine documentation.
Timezone Configuration
By default, the server uses an internal clock set to UTC ('Coordinated Universal Time'). You can change this value with an environment variable ("TZ") when you run the Streamwell Docker container.
Besides the default value of 'UTC', the following values are supported:
America:
America/Argentina/Buenos_Aires
America/Chicago
America/Los_Angeles
America/New_York
America/Toronto
America/Vancouver
Africa:
Africa/Abidjan
Africa/Accra
Africa/Algiers
Africa/Cairo
Africa/Casablanca
Africa/Johannesburg
Africa/Lagos
Asia:
Asia/Dubai
Asia/Kolkata
Asia/Shanghai
Asia/Tokyo
Europe:
Europe/Amsterdam
Europe/London
Europe/Moscow
Europe/Paris
Europe/Rome
Pacific:
Pacific/Auckland
Pacific/Honolulu
Pacific/Sydney
Firewall Config
Windows and macOS offer built-in firewalls in their system settings, where you can allow connections to the Docker application which should allow Streamwell to function if you have these firewalls enabled.
On Ubuntu and many flavours of Linux, the 'ufw' firewall is built-in. Here is an example of configuring ufw for Streamwell (including SSH access on port 22 - if you enable ufw without this you may lock yourself out of your server!):
ufw allow 22,80,443,1935,1936,3333,3334,8000,8001,8080,8081,10010/tcp
ufw allow 9998,9999,10010/udp
ufw enable -yOnce your system is in production, you should disable / block any unused ports as a best security practice.
Enabling Legacy HLS
Certain external players and devices (like ROKU) require a legacy version of the HLS standard when playing the stream back on those devices. To support this we have enabled a deprecated version of the HLS standard. However this module is not actively supported or maintained and may become incompatible over time, so you should use the modern LL-HLS standard whenever possible.
By default, Legacy HLS runs on port 8080 (HTTP) and 8081 (HTTPS) but can be customized on container start with environment variables HLS_LEGACY_PORT and HLS_LEGACY_TLS_PORT.
Here are the steps to enable Legacy HLS in the engine/interface:
1) Under Administration -> Server -> Engine Control -> Configure Engine, there are two sections marked <!-- Legacy HLS --> with <HLS></HLS> configurations that are commented out. Uncomment these, commit the configuration, then restart the engine.
2) Toggle the legacy HLS links in the interface with cheat codes legacyHlsLinksEnabled or legacyHlsLinksDisabled (enter them under Administration -> Customization -> Set Custom Title).
3) A new 'Legacy HLS Link' will appear in the stream info panel on each channel. Ta-da!

Note: HLS streams need to fill their playlist before they are available to stream. For legacy HLS this takes up to 1 minute. You can change the segment duration and count in the engine configuration but it is not recommended to lower it beneath a duration of 3 and a count of 5.
Cheat Codes 🤓
Some advanced, very specific features are activated via CHEAT CODES. These can be entered in Administration -> Customization -> Set Custom Title. Use at your own risk!
encoderControlEnabled / encoderControlDisabled Lets you connect Uray UHE-series encoders directly to channels.
legacyHlsLinksEnabled / legacyHlsLinksDisabled Show links for legacy HLS streams (Old spec, TS chunked instead of fMP4). This is specifically for Roku/Amazon Fire/Android compatibility.
legacyHlsAddRokuSuffixEnabled / legacyHlsAddRokuSuffixDisabled Changes the label on HLS links to refer to them specifically as 'Roku' links.
adminWarningsEnabled / adminWarningsDisabled Supress popup warnings in the admin interface for low space / expiring TLS cert, etc.
webrtcH265SafariEnabled / webrtcH265SafariDisabled OR webrtcH265ChromeEnabled / webrtcH265ChromeDisabled Streamwell 1.8 changed HEVC (H265) playback to low-latency in Safari and Chrome. Use these cheat codes if you prefer to use the previous HLS playback method as the default. You may want to do this if you are screening HDR video as that still requires HLS playback to show in HDR.
hideSsoSyncButtons / showSsoSyncButtons Hides or shows the SSO user sync buttons, preventing admins from syncing with the remote directory (which deletes any users that no longer exist).
voiceChatEnabled / voiceChatDisabled Super-experimental voice chat reveals a "Talk" panel. Word of warning: if this worked well, it would be part of the software by default 😂
classicSpinnerEnabled / classicSpinnerDisabled We changed the player loading spinner in Streamwell 1.8 for one that is more "moving forward" than "going in a circle" - use this cheat code to go back to the OG spinner.
apiEnabled / apiDisabled There is an experimental public-facing API that is totally incomplete, unsupported, and in many cases non-functional. But if you're feeling adventurous you could enable this feature, then send REST-style requests to the endpoints in the /api folder, particularly the channels and users endpoints. To make an API request, include an "Authorization" header like "Basic: abcde" where abcde is a base64-encoded username and password like "user:password". Otherwise it will look for a logged in session.
Since you've read this far, you might also be interested to know that typing "help" at any point will give you the assurance you need most, based on the time of day.
Use External OvenMediaEngine
The best way to use an external OvenMediaEngine instance is to configure your local Streamwell instance of OME in "edge" mode and connect to your origin server via the OME configuration rather than bypassing the internal instance.
However, you can use these environment variables in your Docker compose file or run command to tell Streamwell to fully bypass the internal instance of OME in favour of an external instance:
OME_EXTERNAL_HOST (e.g. www.yourOMEinstance.com) OME_EXTERNAL_KEY (your OME signature key, used to calculate the signed URLs) OME_EXTERNAL_TLS (true / false depending on whether your OME instance uses TLS, default false) OME_EXTERNAL_API_HOST (Same as host, OR another path to the API endpoint if it differs) OME_EXTERNAL_API_KEY (your OME API access key, could be same or different from signature) OME_EXTERNAL_API_PORT (your OME API port. If unset, uses regular API_PORT value)
There are a few considerations when pointing to an external OME instance:
Supported Features: RTMP ingress, SRT ingress, WHIP ingress, web playback, HLS playback, embedded playback.
Unsupported Features: SRT egress, alternative ingress protocols like RTSP/MPEG-TS, ABR (aka Proxy Playback), Talk (secret live chat feature).
To show live thumbnails from the external OME instance, make sure your THUMB_PORT environment variable is set to the port of the external OME thumbnail publisher (Streamwell default is 42070)
For API communication, make sure your API_PORT environment variable is set to the port of the external OME API (Streamwell default is 42069)
The channel information in Streamwell is independent of OME. If you are connecting to another instance of Streamwell, you will need to replicate the channels and secret keys on both systems.
The "Engine Control" dialog will not be available, as it is only able to manage the internal instance of OME in Streamwell.
Recordings can be started and stopped, however the resulting files themselves will be unavailable in Streamwell unless you map the output of your OME instance recordings to the same configuration as is used in the built-in OME instance. Check /opt/ovenmediaengine/bin/conf/Server.xml in the Docker container for details, or contact Pro Services for assistance configuring this.
All HLS and WebSocket traffic is assumed to be proxied to web ports 80/443 using the same proxy definitions found in /start.sh. To bypass the proxy and use the default ports (or those set via variables like WS_PORT, HLS_PORT) you should set your environment variables accordingly with WS_PROXY, HLS_PROXY and HLS_LEGACY_PROXY equal to "false". Contact Pro Services for assistance configuring this.
Use External Database
Streamwell uses a built-in MariaDB 11.4 database server, however it can also be connected to an external / cloud hosted SQL-compatible database by specifying these environment variables in your docker compose file or run command:
DB_HOSTNAME (e.g. www.yourmariadbinstance.com) DB_USERNAME (typically streamwell) DB_PASSWORD DB_PORT (default is 3306) DB_SSL (do not set this if the external DB does not require SSL)
In all cases, Streamwell will look for a schema called... wait for it... streamwell
The user account you provide needs to have the following permissions:
Either ALL PRIVILEGES on, or the ability to create the streamwell schema
SYSTEM_VARIABLES_ADMIN to allow setting up event schedulers
When you start up Streamwell, it will attempt to connect to or create the streamwell schema in the external database. You can also use the web-based backup and restore functionality with an external database host, as well as the AUTO_BACKUP and AUTO_RESTORE flags in your docker compose file or run command.
Hot tip: while we provide many means of backup and restore, it is recommended to keep an independent backup of your database at all times!
Mounted Volume Permissions
If you are mounting external shares (like SMB, NFS) to the Docker container running Streamwell, you may need to account for permissions to allow the application to read/write these external directories.
All services inside the container operate as user streamwell with UID 1000, in group staff. If the staff group exists on your Linux Docker host, you can use the UID of that group otherwise the default UID for staff is 50. In your fstab file on the host where the mount is defined, make sure this group and user are defined.
For example, if you were mounting an SMB v3 share to the REC directory (where recordings are saved), you might store the credentials at /etc/samba/streamwell.cred and specify the user/group UIDs accordingly in your fstab:
//your-server/SHARE /host-home-folder/streamwell/rec cifs credentials=/etc/samba/streamwell.cred,uid=1000,gid=50,file_mode=0775,dir_mode=0775,iocharset=utf8,vers=3.0 0 0Support for this and other advanced configurations are available via Pro Services.
Last updated